WordPress 是一个免费的开源内容管理系统,主要用于在互联网上发布博客。它是用 PHP 编写的,并使用 MariaDB 或 MySQL 作为数据库后端。WordPress CMS 具有许多自定义工具,例如具有用户友好界面的管理仪表板,可用于创建新网页、添加媒体等。WordPress 是当今市场上最常用的 CMS 之一。
在 Ubuntu 22.04 LTS Jammy Jellyfish 上安装带有 LEMP 堆栈的 WordPress
apt步骤 1. 首先,通过在终端中运行以下命令,确保所有系统包都是最新的。
sudo apt update
sudo apt upgrade
sudo apt install software-properties-common dirmngr
步骤 2. 安装 LEMP 堆栈。
在开始本教程之前,必须在您的服务器上安装 LEMP 服务器。如果您没有安装 LEMP Stack,您可以在此处按照我们的指南进行操作。
步骤 3. 在 Ubuntu 22.04 上安装 WordPress。
默认情况下,Ubuntu 22.04 基础存储库中不提供 WordPress。现在运行以下命令,将最新的稳定版 WordPress 下载到您的 Ubuntu 系统:
cd /var/www/html
curl -O https://wordpress.org/latest.tar.gz
WordPress下载后,解压下载的文件:
tar -zxvf latest.tar.gz
我们将需要更改一些文件夹权限:
chown -R www-data:www-data /var/www/html/wordpress
chmod -R 755 /var/www/html/wordpress
步骤 4. 为 WordPress 配置 MariaDB。
默认情况下,MariaDB 未加固。mysql_secure_installation您可以使用脚本保护 MariaDB 。您应该仔细阅读以下每个步骤,这些步骤将设置 root 密码、删除匿名用户、禁止远程 root 登录、删除测试数据库和访问安全 MariaDB:
mysql_secure_installation
像这样配置它:
- Set root password? [Y/n] y
- Remove anonymous users? [Y/n] y
- Disallow root login remotely? [Y/n] y
- Remove test database and access to it? [Y/n] y
- Reload privilege tables now? [Y/n] y
接下来,我们需要登录 MariaDB 控制台并为 WordPress 创建一个数据库。运行以下命令:
mysql -u root -p
这将提示您输入密码,因此请输入您的 MariaDB 根密码并按 Enter。登录到数据库服务器后,您需要为 WordPress 安装创建一个数据库:
MariaDB [(none)]> CREATE DATABASE wordpress_db;
MariaDB [(none)]> CREATE USER 'wordpress_user'@'localhost' IDENTIFIED BY 'your-strong-password';
MariaDB [(none)]> GRANT ALL ON wordpress_db.* TO 'wordpress_user'@'localhost';
MariaDB [(none)]> FLUSH PRIVILEGES;
MariaDB [(none)]> EXIT;
步骤 5. 配置 WordPress。
首先,我们使用以下命令重命名 WordPress 示例配置文件:
mv /var/www/html/wordpress/wp-config-sample.php /var/www/html/wordpress/wp-config.php
然后,编辑 WordPress 配置文件:
nano /var/www/html/wordpress/wp-config.php
添加以下配置:
define( 'DB_NAME', 'wordpress_db' );

/** Database username */
define( 'DB_USER', 'wordpress_user' );

/** Database password */
define( 'DB_PASSWORD', 'your-strong-password' );

/** Database hostname */
define( 'DB_HOST', 'localhost' );
步骤 6. 为 WordPress 配置 Nginx 虚拟主机。
现在创建一个 Nginx 虚拟主机配置文件:
nano /etc/nginx/conf.d/wordpress.conf
添加以下文件:
server {
    listen 80;
    root /var/www/html/wordpress;
    index  index.php index.html index.htm;
    server_name  your-domian.com;

    client_max_body_size 500M;

    location / {
        try_files $uri $uri/ /index.php?$args;
    }

    location = /favicon.ico {
        log_not_found off;
        access_log off;
    }

    location ~* \.(js|css|png|jpg|jpeg|gif|ico)$ {
        expires max;
        log_not_found off;
    }

    location = /robots.txt {
        allow all;
        log_not_found off;
        access_log off;
    }

    location ~ \.php$ {
         include snippets/fastcgi-php.conf;
         fastcgi_pass unix:/var/run/php/php8.1-fpm.sock;
         fastcgi_param SCRIPT_FILENAME $document_root$fastcgi_script_name;
         include fastcgi_params;
    }
}
保存并关闭文件,然后重新启动 Nginx Web 服务器以进行更改:
nginx -t
sudo systemctl restart nginx
sudo systemctl restart php8.1-fpm
步骤 6. 在 WordPress 上启用 HTTPS。
首先,我们使用以下命令在 Ubuntu 22.04 上安装Certbot :
sudo snap install core
sudo snap refresh core
sudo snap install --classic certbot
sudo ln -s /snap/bin/certbot /usr/bin/certbot
完成安装 Certbot 后,现在我们使用以下命令为 Nginx 设置 Certbot:
sudo apt install python3-certbot-nginx
接下来,运行以下命令开始创建证书:
sudo certbot --nginx --agree-tos --redirect --hsts --staple-ocsp --email admin@your-domain.com -d www.your-domain.com
输出:
-------------------------------------------------------------------------------
Congratulations! You have successfully enabled https://domain.com and https://www.your-domain.com

You should test your configuration at:
https://www.ssllabs.com/ssltest/analyze.html?d=your-domain.com
https://www.ssllabs.com/ssltest/analyze.html?d=www.your-domain.com
-------------------------------------------------------------------------------

IMPORTANT NOTES:
- Congratulations! Your certificate and chain have been saved at:
/etc/letsencrypt/live/your-domain.com/fullchain.pem
Your key file has been saved at:
/etc/letsencrypt/live/your-domain.comm/privkey.pem
Your cert will expire on 2022-05-20. To obtain a new or tweaked
version of this certificate in the future, simply run certbot again
with the "certonly" option. To non-interactively renew *all* of
your certificates, run "certbot renew"
- If you like Certbot, please consider supporting our work by:

Donating to ISRG / Let's Encrypt: https://letsencrypt.org/donate
Donating to EFF: https://eff.org/donate-le
Let’s Encrypt 证书的有效期为 90 天,强烈建议在证书到期前更新证书。要测试此更新过程是否正常工作,您可以运行:
sudo certbot renew --dry-run
输出:
Saving debug log to /var/log/letsencrypt/letsencrypt.log

- - - - - - - - - - - - - - - - - - - - - - - - - - - - - - - - - - - - - - - -
Processing /etc/letsencrypt/renewal/your-domain.com.conf
- - - - - - - - - - - - - - - - - - - - - - - - - - - - - - - - - - - - - - - -
Account registered.
Simulating renewal of an existing certificate for your-domain.com and www.your-domain.com

- - - - - - - - - - - - - - - - - - - - - - - - - - - - - - - - - - - - - - - -
Congratulations, all simulated renewals succeeded:
  /etc/letsencrypt/live/domain.com/fullchain.pem (success)
- - - - - - - - - - - - - - - - - - - - - - - - - - - - - - - - - - - - - - - -
步骤 7. 配置防火墙。
Ubuntu 22.04ufw默认运行防火墙。通过端口80HTTP 和443HTTPS 启用连接:
sudo ufw allow 'Nginx FULL'
sudo ufw enable
sudo ufw status
步骤 8. 访问 WordPress Web 界面。
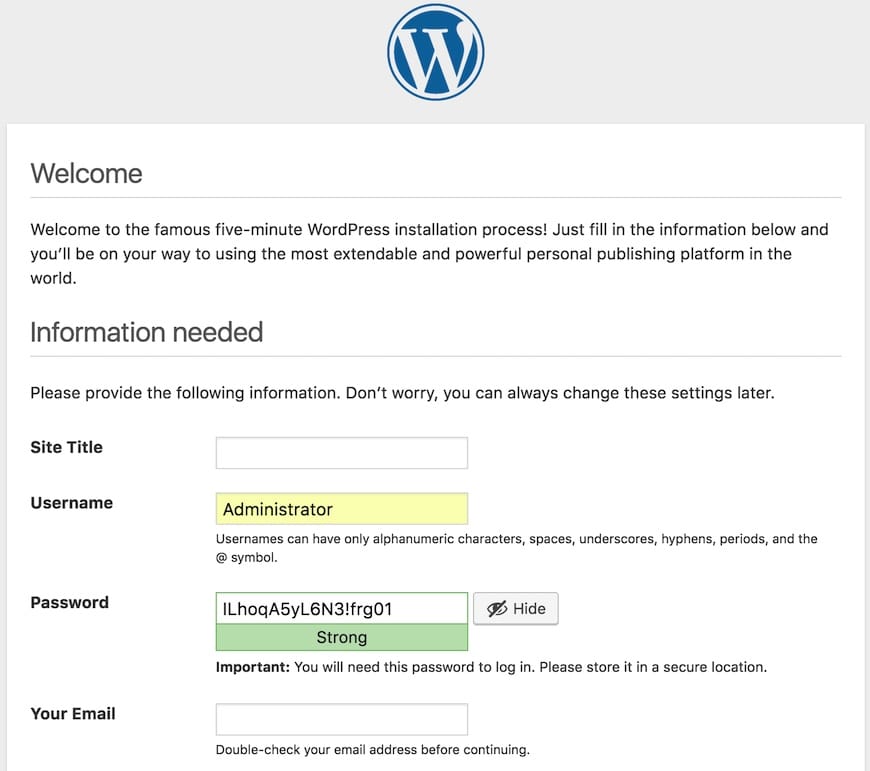
成功安装后,打开 Web 浏览器并使用 URL 访问 WordPress 安装向导。您将被重定向到以下页面:https://your-domain.com

感谢您使用本教程在 Ubuntu 22.04 LTS Jammy Jellyfish 系统上安装带有 LEMP 的 WordPress。如需其他帮助或有用信息,我们建议您查看WordPress 网站。