Squid 是最常用的代理服务器之一,用于控制来自本地网络的 Internet 访问并保护网络免受非法访问流量和攻击。Squid 还通过缓存和重用频繁请求的网页来减少带宽并提高响应时间。Squid 具有广泛的访问控制功能,是出色的服务器加速器。
在 Debian 11 Bullseye 上安装 Squid 代理
apt步骤 1. 在我们安装任何软件之前,通过在终端中运行以下命令来确保您的系统是最新的,这一点很重要:
sudo apt update
sudo apt upgrade
步骤 2. 在 Debian 11 上安装 Squid 代理。
默认情况下,Squid 代理在 Debian 11 基础存储库中不可用。因此,现在运行以下命令将 Squid Proxy 安装到您的系统:
sudo apt install squid
安装完成后,代理将自动启动。要验证其功能是否正确,请运行以下命令:
sudo systemctl status squid
步骤 3. 在 Debian 11 上配置 Squid 代理。
首先,我们创建 Squid 可以用来验证用户身份验证的身份验证文件:
htpasswd -b /etc/squid/squid_passwd [username] [password]
例如,创建 Squid 身份验证:
htpasswd -b -c /etc/squid/squid_passwd meilana maria
现在转到位于以下位置的 Squid 代理服务器的主配置文件:/etc/squid/squid.conf
sudo nano /etc/squid/squid.conf
添加以下配置:
sudo nano /etc/squid/squid.conf
# Recommended minimum configuration:
auth_param basic program /usr/lib/squid3/basic_ncsa_auth /etc/squid/squid_passwd
acl ncsa_users proxy_auth REQUIRED
http_access allow ncsa_users

acl manager proto cache_object
acl localhost src 127.0.0.1/32
acl to_localhost dst 127.0.0.0/8 0.0.0.0/32
acl SSL_ports port 443
acl Safe_ports port 80            # http
acl Safe_ports port 21            # ftp
acl Safe_ports port 443           # https
acl Safe_ports port 1025-65535    # unregistered ports
acl Safe_ports port 280           # http-mgmt
acl Safe_ports port 488           # gss-http
acl Safe_ports port 591           # filemaker
acl Safe_ports port 777           # multiling http
acl SSL_ports port 9001           # webmin
acl CONNECT method CONNECT

http_access allow manager localhost
http_access deny manager
http_access deny !Safe_ports
http_access deny CONNECT !SSL_ports
http_access deny all
http_port 3128 # Squid normally listens to port 3128

forwarded_for off

request_header_access Allow allow all
request_header_access Authorization allow all
request_header_access Proxy-Authorization allow all
request_header_access Proxy-Authenticate allow all
request_header_access Cache-Control allow all
request_header_access Content-Encoding allow all
request_header_access Content-Length allow all
request_header_access Content-Type allow all
request_header_access Date allow all
request_header_access Expires allow all
request_header_access Host allow all
request_header_access If-Modified-Since allow all
request_header_access Last-Modified allow all
request_header_access Location allow all
request_header_access Pragma allow all
request_header_access Accept allow all
request_header_access Accept-Charset allow all
request_header_access Accept-Encoding allow all
request_header_access Accept-Language allow all
request_header_access Content-Language allow all
request_header_access Mime-Version allow all
request_header_access Retry-After allow all
request_header_access Title allow all
request_header_access Connection allow all
request_header_access Proxy-Connection allow all
request_header_access User-Agent allow all
request_header_access Cookie allow all
request_header_access All deny all
visible_hostname idroot.us
保存并关闭文件,然后重新启动 squid 代理服务器以应用更改:
sudo systemctl restart squid
步骤 4. 配置防火墙。
默认情况下,在 Debian 上启用了 UFW 防火墙。根据您的 Squid 配置文件,打开端口 3128 以允许 HTTP 流量:
ufw allow 3128/tcp
sudo ufw reload
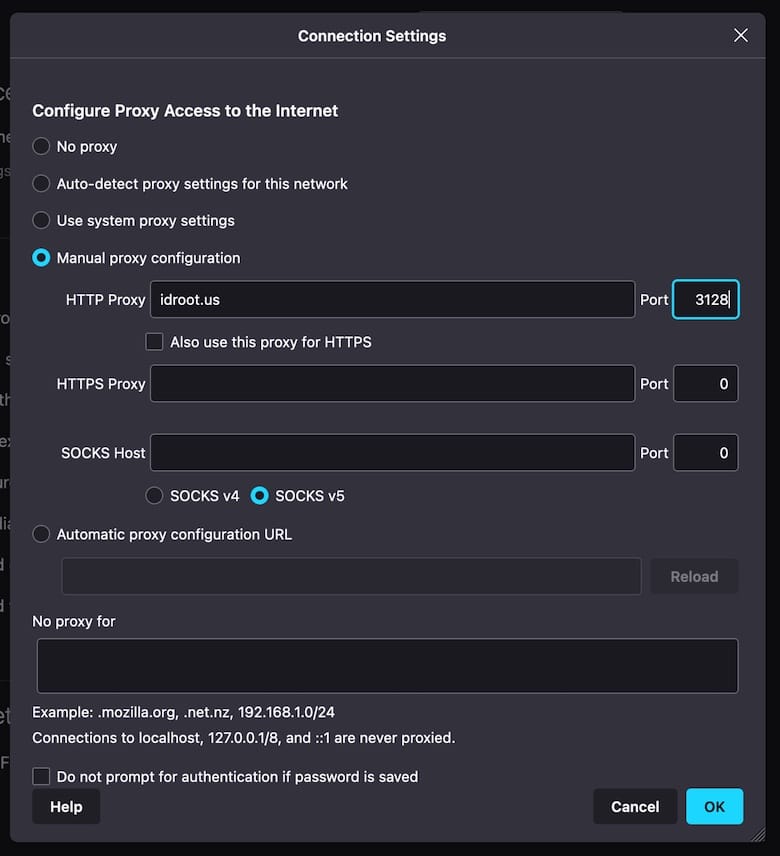
步骤 5. 为 Squid 代理服务器配置客户端。
让我们用 Firefox Web 浏览器做一个简单的代理测试,将其配置为通过您的 Squid 服务器连接外部网络。.Preferences -> General -> Network Settings -> Manual Proxy Configuration

感谢您使用本教程在 Debian 11 Bullseye 上安装最新版本的 Squid 代理。如需更多帮助或有用信息,我们建议您查看Squid 官方网站。