WordPress 是一个基于 PHP 和 MariaDB 的简单内容管理系统。它也是一款开源软件,可用于创建漂亮的网站、博客或应用程序。WordPress 有许多功能可以简化网站或博客的设置和自定义,这也是它如此受欢迎的部分原因。
在 Fedora 35 上安装 WordPress
第 1 步:在继续之前,更新您的 Fedora 操作系统以确保所有现有的软件包都是最新的。使用此命令更新服务器包:
sudo dnf upgrade
sudo dnf update
步骤 2. 安装 LAMP 服务器。
在您的服务器上安装 WordPress 之前,您需要了解如何在 Fedora 服务器上安装 LAMP。
步骤 3. 在 Fedora 35 上安装 WordPress。
wget现在使用以下命令从官方页面下载最新版本的 WordPress :wget -O /tmp/wordpress.tar.gz https://wordpress.org/latest.tar.gz
接下来,解压缩下载的 WordPress 文件:
tar -xzvf /tmp/wordpress.tar.gz -C /var/www/html
我们将更改权限目录:
chown -R www-data.www-data /var/www/html/wordpress
chmod -R 755 /var/www/html/wordpress
步骤 4. 配置 MariaDB。
默认情况下,MariaDB 未加固。mysql_secure_installation您可以使用脚本保护 MariaDB 。您应该仔细阅读下面的每个步骤,这些步骤将设置 root 密码、删除匿名用户、禁止远程 root 登录、删除测试数据库和访问安全 MariaDB:
mysql_secure_installation
像这样配置它:
- Set root password? [Y/n] y
- Remove anonymous users? [Y/n] y
- Disallow root login remotely? [Y/n] y
- Remove test database and access to it? [Y/n] y
- Reload privilege tables now? [Y/n] y
接下来,我们需要登录 MariaDB 控制台并为 WordPress 创建一个数据库。运行以下命令:
mysql -u root -p
这将提示您输入密码,因此请输入您的 MariaDB 根密码并按 Enter。登录到数据库服务器后,您需要为 WordPress 安装创建一个数据库:
MariaDB [(none)]> CREATE DATABASE wordpress_db;
MariaDB [(none)]> CREATE USER 'wordpress_user'@'localhost' IDENTIFIED BY 'your-strong-password';
MariaDB [(none)]> GRANT ALL PRIVILEGES ON wordpress_db.* to wordpress_user@'localhost';
MariaDB [(none)]> FLUSH PRIVILEGES;
MariaDB [(none)]> exit
然后,设置 WordPress 默认配置文件名为:wp-config.php
nano /var/www/html/wordpress/wp-config.php
添加以下配置:
define( 'DB_NAME', 'wordpress_db' );

/** MySQL database username */
define( 'DB_USER', 'wordpress_user' );

/** MySQL database password */
define( 'DB_PASSWORD', 'your-strong-password!' );

/** MySQL hostname */
define( 'DB_HOST', 'localhost' );
保存并关闭文件。
步骤 5. 配置 Apache。
我们将为您的 Drupal 网站创建一个 Apache 虚拟主机。首先,使用您喜欢的文本编辑器创建 ‘ ‘ 文件:/etc/httpd/conf.d/wordpress.conf
nano /etc/httpd/conf.d/wordpress.conf
添加以下文件:
<VirtualHost *:80>
     ServerName mysite.com
     ServerAlias www.your-domain.com
     ServerAdmin admin@your-domain.com
     DocumentRoot /var/www/html/wordpress/

     <Directory /var/www/html/wordpress>
            Options Indexes FollowSymLinks
            AllowOverride All
            Require all granted
            RewriteEngine on
            RewriteBase /
            RewriteCond %{REQUEST_FILENAME} !-f
            RewriteCond %{REQUEST_FILENAME} !-d
            RewriteRule ^(.*)$ index.php?q=$1 [L,QSA]
    </Directory>
</VirtualHost>
保存并关闭文件,然后重新启动 Apache 服务以使更改生效:
sudo systemctl restart httpd
sudo systemctl enable httpd
步骤 6. 使用 Let’s Encrypt SSL 免费证书保护 Apache
首先,我们使用以下命令安装 Certbot:
sudo dnf install certbot python3-certbot-apache
然后,为 Apache 安装 SSL 证书,如下所示:
sudo certbot --apache
进入交互式提示并安装证书。如果安装了证书,您将看到以下祝贺消息:
Congratulations! You have successfully enabled HTTPS on https://your-domain.com
NEXT STEPS:
- The certificate will need to be renewed before it expires. Certbot can automatically renew the certificate in the background, but you may need to take steps to enable that functionality. See https://certbot.org/renewal-setup for instructions.

- - - - - - - - - - - - - - - - - - - - - - - - - - - - - - - - - - - - - - - -
If you like Certbot, please consider supporting our work by:
 * Donating to ISRG / Let's Encrypt:   https://letsencrypt.org/donate
 * Donating to EFF:                    https://eff.org/donate-le
- - - - - - - - - - - - - - - - - - - - - - - - - - - - - - - - - - - - - - - -
步骤 7. 配置防火墙。
允许防火墙使用 HTTP 和 HTTPS 并使用以下命令重新加载它:
sudo firewall-cmd --permanent --zone=public --add-service=http
sudo firewall-cmd --permanent --zone=public --add-service=https
sudo firewall-cmd --reload
步骤 8. 访问 WordPress Web 界面。
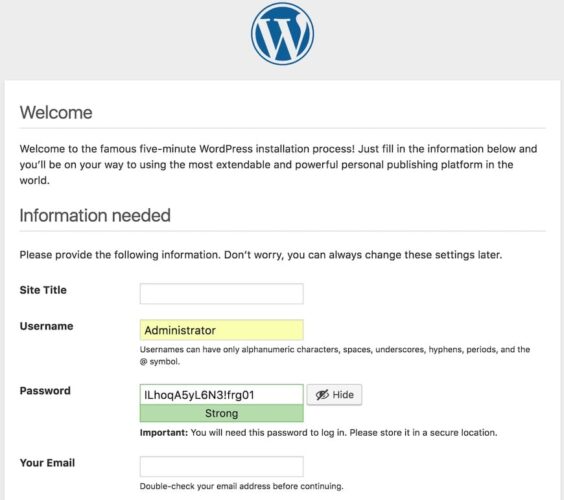
成功安装后,打开您的 Web 浏览器并使用 URL 访问 WordPress CMS 。您将被重定向到以下页面:https://your-domain.com

感谢您使用本教程在 Fedora 35 系统上安装 WordPress CMS。如需更多帮助或有用信息,我们建议您查看WordPress 官方网站。